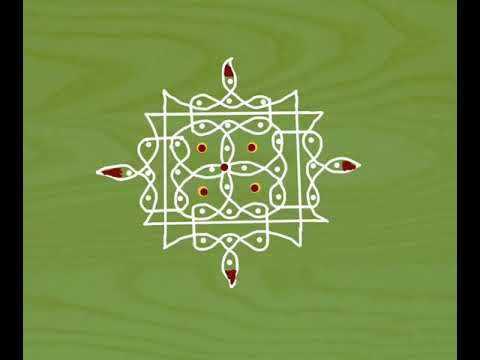
Showing posts with label #rangolidesigns. Show all posts

Wednesday, November 4, 2026

🌷 Creative Rangoli Designs 🌷


🌸 Step 1: Make the Line Dot Grid

First draw 4 long lines arrange 3 × 3 dots in a neat and symmetrical pattern on both side of each line.place one dot middle of 3 dots in the lower line  Keep equal gaps between the dots so that your rangoli looks clean and well .

🌸 Step 2: Start with the Centre

Begin drawing from the middle of the dot grid. Create small, beautiful curves and loops around the centre dots. These will form the basic structure of your rangoli.

🌸 Step 3: Join the Dots with Curved Lines

Slowly extend the design from the centre towards the outer dots. Connect the nearby dots with smooth, flowing curves, making sure the lines go around the dots to create a lovely pattern.

🌸 Step 4: Draw the Outer Petals

Now, work on the outer part of the design by drawing small petal-shaped loops around the corner and edge dots. This gives your rangoli a beautiful floral appearance.


Sunday, August 9, 2026

🌷Creative Rangoli Design99🌷14*2 Dots Muggu🌷


🌸 Step 1: Draw the Dot Grid

Start by placing 14*2 dots Leave one dot on both sides in a symmetrical pattern (like a square or diamond shape). Keep equal spacing between each dot so the design looks neat and balanced.


🌸 Step 2: Begin with Center Loops

Start from the middle of the grid. Draw small curved loops around the central dots. These loops will form the base of your rangoli design.


🌸 Step 3: Connect the Dots with Curves

Now, extend the curves from the center outward. Join nearby dots using smooth, flowing lines. Make sure the lines curve around the dots rather than touching them directly.


🌸 Step 4: Create Outer Petal Shapes

At the edges, draw teardrop or petalshaped loops around the outer dots. This gives the rangoli a floral and decorative look.


🌸 Step 5: Add Finishing Touches

  • Draw small circles inside some spaces for decoration

  • Make all lines darker and smoother

  • Add colors if you like for a vibrant finish


Monday, July 20, 2026

🌷13*7 Daily Muggulu & 13*7 Easy Kolam🌷

 Learn Rangoli Design Step by Step

Hi everyone! 
Welcome back to my blog 

If you’ve ever wanted to create beautiful rangoli designs but didn’t know where to start, this is for you  Today, I’m sharing how you can learn easy and stunning rangoli designs step by step through my YouTube channel.

🌸 What you’ll learn:

  • Simple beginner-friendly rangoli patterns
  • Step-by-step drawing techniques
  • Tips to improve symmetry and neatness
  • Creative designs for festivals like Diwali 

I explain everything slowly and clearly, so even beginners can follow along without any confusion. You can pause, practice, and create your own beautiful designs at your own pace.

 Start with dots (pulli/kolam style) and build your design gradually

Check out my YouTube channel and start your rangoli journey today. Don’t forget to like, share, and subscribe for more creative tutorials

Let’s create something beautiful together 💫

  1. Prepare the Surface

    • Clean the floor area where you want to draw.

    • Sprinkle a little water to keep the design intact (optional).

  2. Decide the Base Shape

    • Use chalk or white powder to draw guiding dots or a basic outline (circle, square, star, or freehand).

    • Beginners often start with dot rangoli (placing dots in rows and connecting them into shapes).

  3. Create the Outline

    • Connect the dots or freehand draw curves, spirals, triangles, flowers, or geometric shapes.

    • Symmetry is important most rangolis are circular and balanced.

  4. Add Patterns

    • Inside the outline, draw small motifs like:

      • Flowers 

      • Leaves 

      • Diyas

      • Stars 

      • Swirls 

  5. Fill with Colors

    • Use rangoli powder, colored sand, rice flour, or flower petals.

    • Start from the center and move outward to avoid smudging.

    • Use contrasting colors for borders and highlights.

  6. Decorate

    • Place diyas (oil lamps), candles, or flowers around the rangoli.

    • Add dots, small borders, or glitter for finishing touches.


Friday, July 17, 2026

🌸Sikku Kolam🌸Melika Muggulu Design 15🌸


Step 1: Draw the Dot Grid

Start by placing dots in a symmetrical pattern (like a square or diamond shape). Keep equal spacing between each dot so the design looks neat and balanced.


🌸 Step 2: Begin with Center Loops

Start from the middle of the grid. Draw small curved loops around the central dots. These loops will form the base of your rangoli design.


🌸 Step 3: Connect the Dots with Curves

Now, extend the curves from the center outward. Join nearby dots using smooth, flowing lines. Make sure the lines curve around the dots rather than touching them directly.


🌸 Step 4: Create Outer Petal Shapes

At the edges, draw teardrop or petalshaped loops around the outer dots. This gives the rangoli a floral and decorative look.


🌸 Step 5: Add Finishing Touches

  • Draw small circles inside some spaces for decoration

  • Make all lines darker and smoother

  • Add colors if you like for a vibrant finish


Monday, May 4, 2026

🌹Rose flower Muggu 🌹Roseflower Kolam 🌹(Rangoli Design-43)🌹

  1. Prepare the Surface

    • Clean the floor area where you want to draw.

    • Sprinkle a little water to keep the design intact (optional).

  2. Decide the Base Shape

    • Use chalk or white powder to draw guiding dots or a basic outline (circle, square, star, or freehand).

    • Beginners often start with dot rangoli (placing dots in rows and connecting them into shapes).

  3. Create the Outline

    • Connect the dots or freehand draw curves, spirals, triangles, flowers, or geometric shapes.

    • Symmetry is important most rangolis are circular and balanced.

  4. Add Patterns

    • Inside the outline, draw small motifs like:

      • Flowers 

      • Leaves 

      • Diyas

      • Stars 

      • Swirls 

  5. Fill with Colors

    • Use rangoli powder, colored sand, rice flour, or flower petals.

    • Start from the center and move outward to avoid smudging.

    • Use contrasting colors for borders and highlights.

  6. Decorate

    • Place diyas (oil lamps), candles, or flowers around the rangoli.

    • Add dots, small borders, or glitter for finishing touches.


🌷 Creative Rangoli Designs 🌷

  🌸 Step 1: Make the Line Dot Grid First draw 4 long lines arrange 3 × 3 dots in a neat and symmetrical pattern on both side of each line...